If you work or serve in a church, chances are you use Planning Center Online a lot. We use their Services product to plan and organize our weekend services, schedule volunteers, etc.
Even though they have a mobile app and desktop interface, we still rely on printed reports on the weekend. It’s simple, fast, we don’t have to worry about the internet going down, the team members can write all over them, etc.
Out of the box, Planning Center comes with some great reports that you can print out. They can somewhat tailored to your organization with your church’s name or logo, etc.

In addition to their standard reports, they also support custom reporting. If you know a little HTML, CSS, and are ready to learn some custom tags, it’s pretty easy to jump right in.
The reporting language that PCO uses is called Liquid. If you want a good resource to read that is outside of what PCO offers, here is one.
Liquid is an open source templating language that allows you to do simple conditional and iteration along with filters to parse and control the page as it loads. What this means for you as a user is that you have a lot of simple power at your fingertips to create custom reports designed for exactly what you need!
So, with these tools, I have created several custom reports that our teams use when it is time to print out paperwork for weekend services.
The report I use most often is for our tech team. It prints out a customized version for every person serving on the team that weekend, with their name, the general service flow, and information just for their position, notes, checklists, etc.

The nice thing about this report is that I only have to run it once and print once. It creates a new page for every person on the team, so I don’t have to remember how many copies I need to print – I just print the whole file and it has exactly what each person/position needs!
This report includes custom plan item notes per position. To add those, just add a plan item with an item note named:
Position Name
The name has to match exactly. The report also includes overall plan notes per position. To add those, just add plan notes like this:
Team Name – Position Name
When you add your plan notes or plan item notes, just type something specific in that field and only that position will see it when it prints. We like this a lot on our teams because it keeps the report looking a lot simpler for those who don’t need all the extra detail.
One thing you may not have noticed is that I include checklists, customized for each position on the team. We have found checklists to be very helpful so we don’t miss any of the mundane stuff, especially when volunteers may only be serving once a month.
If you use my custom report file, all of the checklist code is already created for you. You just need to create the Plan Note fields to correspond with each position. Each position that has a checklist item should have a Plan Note Field like this:
Checklist – Team Name – Position Name
Any item in the list that begins with a “*” (asterisk) will be printed in a “DURING REHEARSAL” section, and only printed once. Any item that begins with a “~” (tilde) will be printed in an “AFTER EACH SERVICE” section for each service time and will include a small blank line for notes. Any other item will be printed in a “BEFORE SERVICE” section and will be printed once for each service time.
So, for example, a plan note in the field “Checklist – Tech Team – Stage Manager”:
*Take out trash
This would only print one time in the checklist, in the “During Rehearsal” section. You can edit the report to rename that header if you’d like.
~Shut all doors
This would print multiple times, once for each service time, in the “After Each Service” section.
Check for presentation
This would print multiple times, once for each service time, in the “Before Each Service” section. This is likely going to be the most-used field, so it is the one with the simplest formatting requirements.
I like to keep all of my checklists in a Template Plan (with no other items or people) within PCO, and just import them each week to the plan before printing. This allows me to update the checklists from time to time without hardcoding it into the report file, and I can customize it per-plan if needed.
I hope this is helpful to you! You can download all of my custom reports here: https://github.com/josephdadams/PlanningCenterServicesReports/

Trying to use this to implement the checklist idea in our system, but I’m struggling to get the PCO side of things set up. Is it possible to get a screen shot of how you set up each part in the plan?
Also, when i imported the code, it looks nothing like your screenshot. I’m pretty new to CSS/Liquid and have familiarity with basic HTML. Can you give me any pointers?
LikeLike
Sure! I can send you screenshots. I’ll reach out to you via email with those early in the week. Send me a screenshot of how yours looks as well, so I can see what’s going on. Thanks!
LikeLike
Hey just seeing if you got it working? I am trying to the same method but can’t get the checklists to show!
LikeLike
I love this! Thanks for sharing your use case. I have browsed through the rest of your blog and love what you are doing! Keep it up!
LikeLiked by 1 person
Hi! Was wondering if I could also get screenshots of what your plan looks like, Ive taken the steps you have mentioned but it isn’t working. Amazing job by the way, cant wait to get it working
LikeLike
Mark, I will email you some screenshots. I hope that helps!
LikeLike
Thanks so much!
LikeLike
Hey did you need my email address? thanks again!
LikeLike
Hey man could you offer some help, I think im having the same issues as everyone else! Thanks man!
LikeLike
Colton, I’ll sent you an email. I was able to get Mark going! I’m not sure about Dan, he stopped replying.
LikeLike
Hey, sorry! Started working on it and then things got busy. Still not quite there getting it to work.
LikeLike
This seems very helpful as I am trying to setup our Planning Center for our church plant. I’ve imported your file, but the results look different as others have said, and the checklists aren’t showing up…any help you could provide would be greatly appreciated.
LikeLike
Grant, have you created the plan note categories as described above?
LikeLike
I have, as well as putting in some item notes, the item notes show up, but there is no checklist for the Plan Notes “Checklist-Audio/Visual-Audio…
LikeLike
Make sure it’s “Checklist – Team – Position”. Note the spaces between the hyphens.
LikeLike
I’ve tried both ways and with both of the reports on the github link. Neither will print the checklists, and both will only print with the “assign position_to_print” with a position after the =. If I don’t put anything in there and try to allow the “array categories_to_print” with my teams, I get nothing or just a Roster. Is there anyway you could e-mail me some screenshots as it looks like some of the coding on my end is not adding up correctly or at least some of the html are bright red which I think mean they are not properly formatted.
LikeLike
It might be more efficient if we set up a time to look at this together via TeamViewer. Reach out to me via the contact form and we can set something up.
LikeLike
Hey man – this is really great. Love the video as well, that was a huge help.
I’m curious if there is any way to show category notes that are specific to each position instead of choosing a few specific items to show on all of the pages.
LikeLike
Absolutely. My report described here does this. If you name a Plan Note (not Plan Item Note) with this naming method: “Team Name – Position Name”, it will print out whatever is in that field for that position only. We don’t do this too often but it’s nice to have! Anything that is just the team name only will print for everyone on that team. Let me know if that helps!
LikeLike
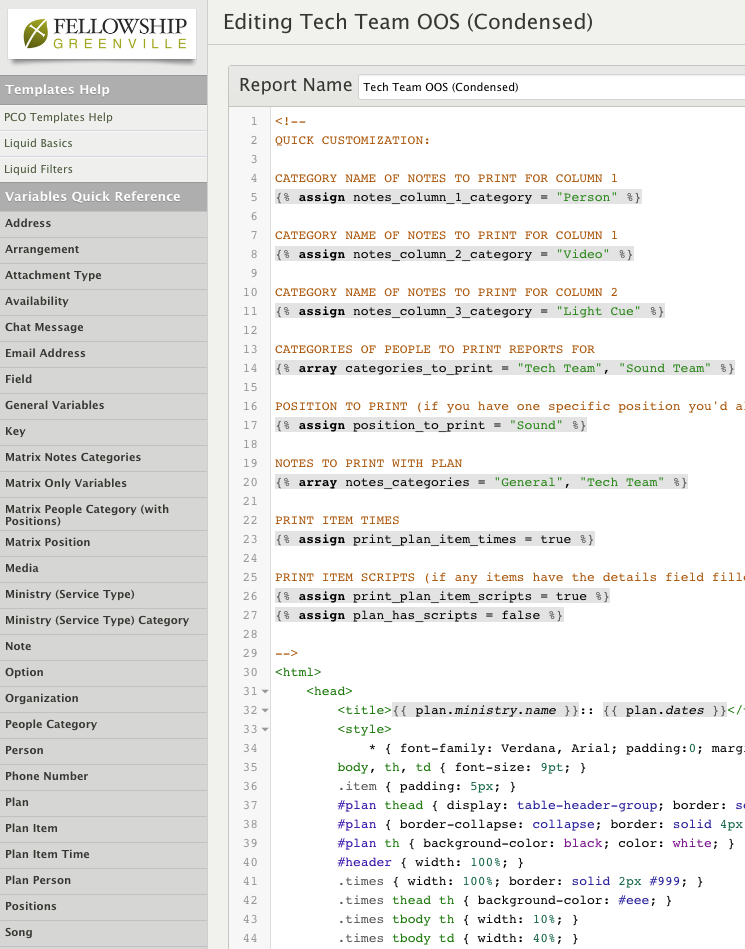
I should have clarified – I was thinking more along the lines of item notes. In your example, the first three items that can be customized you have listed as:
CATEGORY NAME OF NOTES TO PRINT FOR COLUMN 1
{% assign notes_column_1_category = “Leader” %}
CATEGORY NAME OF NOTES TO PRINT FOR COLUMN 1
{% assign notes_column_2_category = “Video” %}
CATEGORY NAME OF NOTES TO PRINT FOR COLUMN 2
{% assign notes_column_3_category = “Light Cue” %}
I would like to customize each of those category notes to coincide with each position. So that my “Leader” only sees the “Leader” notes. My Video only sees “Video” notes, etc.
At the moment, when I follow the structure in your sample, all of my positions see the same 3 columns of notes.
LikeLike
Gotcha. Yes, this can be done pretty easily. We do this for a few specific areas and just add a conditional (this is pseudocode but will give you the idea) “if Team is X and position is Y, print column Z”. I also have some reports where we print the item note as a column instead of a row. The key is to either fill in the note or use a blank space so that the report continues to be spaced correctly if an item lacks a note for that field. I could show you how to do this over a teamviewer session if it would help.
LikeLike
That would help a lot. I’ve done a few things to ensure that each member gets the info they need, but yes, now my spacing is all over the place.
LikeLike
Reach out to me via the contact form and let’s set up a time!
LikeLike
Does this custom report work with Split Teams?
LikeLike
Probably not out of the box.
LikeLike
Hi! I need some help getting this up and running. I am almost there but still no output when I go to test it.
LikeLike
Happy to help. Reach out to me via the contact form.
LikeLike
Thank you! I just reached out!
LikeLike
I haven’t been able to get the checklist to show up. I think I have followed the directions properly. I do have screenshots I can share if you can help me figure this out. Thank you!
LikeLike
Let’s figure this out over email. Send me a message via the contact form.
LikeLike